Hand-Dipped Taper Candles
Hand-dipped tapers provide charming light in the darkness of winter.
You will need:
Beeswax or another type of wax
Wicking
A tall dipping container
A tall container of cold water
Washers or bolt nuts
Double boiler (or two pans)
Newspaper
Scissors or sharp knife
To begin, cover the area with newspapers as this is one of the messiest forms of candlemaking. Decide how long you want your candles. You will be dipping two at a time, so measure a piece of wicking twice your desired length, then add two inches. Cut the wicking. Tie the washers, bolt nuts or a similar small object to the wick. These will be used to weigh down the wicking and keep it straight during the dipping process.
Beeswax makes the best taper candles, as it adheres to its own layers very well, however, any wax can be used to produce decent result. Heat the wax in a double boiler, or if you don’t have one, make one by placing the wax in a pan that sits on top of a second pan filled with water. Heat the wax until it is melted. It is very flammable, so if it begins to smoke, remove it from the burner immediately.
You don’t want the wax to be too hot for this project or the dipped layers will be too thin to adhere. As soon as the wax is melted completely, remove it from the heat. Pour it into the tall dipping container; the container should be several inches taller than your wicking.
Holding the wick in the center, dip both ends into the wax, almost to the top; just beware your fingers don’t touch the wax. Wait until the wick hardens. Dip the wicking into the hot wax once again, then quickly dip it into the container of cold water. This will immediately harden the wax. When you pull the wicks from the water, run your hand down them to remove excess water, which could cause bubbles in the finished candles. Continue alternating dips in the wax and the cold water, removing excess water each time. Keep your dipping hand steady as possible to ensure straight candles. Keep dipping until the candles reach your desired thickness. Usually about 25 dunks makes a good candle.
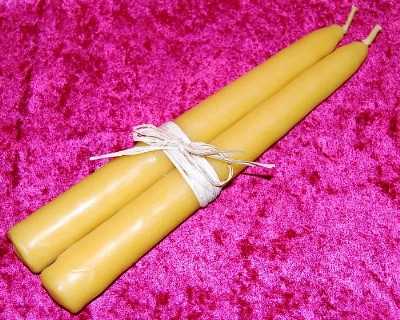
Using a sharp knife or a pair of scissors, cut the now wax-covered weights off the bottom of the candles. Once more, dip the candles into the wax, then the water to give them a smooth finish. Drape the candles over a stick or a dowel and leave them to completely harden for a few days. At that point, you can cut the wick in the center. The candles can be made into a lovely gift by bundling several together and tying them with ribbon or raffia.
By Amber Reifsteck, The Woodland Elf
The information provided on this website is for general information purposes only. If you choose to rely on the information on this website, you do so at your own risk and you assume responsibility for the results. (Full disclaimer here)
Enjoy this post? Click here to subscribe by email and get new posts delivered to your inbox.Ads by Google