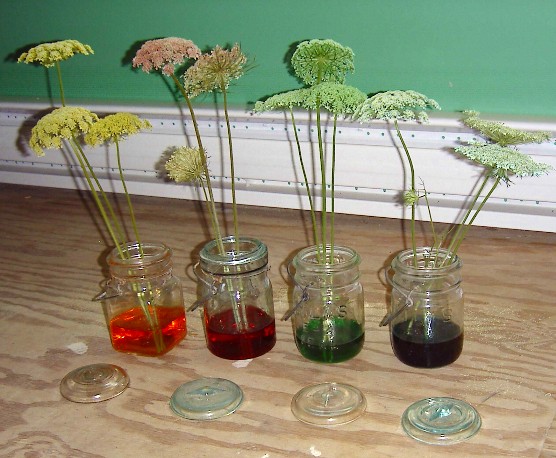
Dying Queen Anne’s Lace
Queen Anne’s Lace, also known as Wild Carrot, must have one of the longest blooming seasons of any flower in the blossoming world. It’s a familiar summer sight, as the large, white blossom line the road sides and glow amidst the open meadows of the cow pasture. The best part about it, however, (aside from the fact that it makes great filler in bouquets when you’re in a pinch for flowers) is that it can be dyed almost as easily as yarn, and with a lot less mess.

A Fun Summer Pastime
I don’t think there are many kids around here who haven’t dyed Queen Anne’s Lace at least once, it’s sort of a country tradition. It’s a summer pastime my neighbor showed me when I was about 5 years old. I’ve been doing it every summer since. Queen Anne’s Lace can be dyed any color of the rainbow with a little food coloring and bit of patients. And no matter how many times a person tries this, it never gets old. It remains just as magical as it was the first time.
The head of a Queen Anne’s Lace flower is made up of hundreds of tiny blossoms. Each blossom unfolds its individual petals to produce the lacy network of the entire flower. These blossoms are very receptive to coloring when they are allowed to drink food colorant through their stems. The resulting effect is a beautiful web of delicate petals brightly displaying any color a person can mix.
Dying Queen Anne’s Lace Is Easy To Do
To begin, it is important to pick suitable blossoms. All Queen Anne’s Lace will take up dye to some degree, but for truly vibrant color, there are better times to pick the flowers than others. It is best to harvest the flowers when 1/2 to 2/3 of the of the head’s tiny blossoms have opened. The head itself will be opened flat, with the ends rounding down a bit, much like an open umbrella. Flowers picked too early never open fully to display the dyed petals. Flowers picked too late generally wither away before they can take up enough colored water to show. It may take a few attempts to find the right cutting time.
Once you have the flowers, fill a glass with a cup of cool water. Take a bottle of food coloring of your choice and place 10-20 drops in the water. Stir well. I find that yellow and green work the best and require less colorant than reds and blues. You can also dye multiple flowers in the same glass at the same time. Leave the flowers in the water for a few days, sit back, and watch them change color.
Put Those Dyed Flowers To Use
Once the flowers are dyed, they can be easily dried by cutting the heads off the stems. Lay them flat upon the ground, with the stem stub pointing skyward. Leave them in a dry place for a week. Once dry, the flowers can be carefully hot-glued to a wreath form, one by one to make a simple, but striking wreath.
By Amber Reifsteck, The Woodland Elf
The information provided on this website is for general information purposes only. If you choose to rely on the information on this website, you do so at your own risk and you assume responsibility for the results. (Full disclaimer here)
Enjoy this post? Click here to subscribe by email and get new posts delivered to your inbox.Ads by Google


what about dyeing them to use in live arrangements?
Yup, you could do that too, though they might not last very long. By the time they’ve taken up the food coloring, they’re starting to die out a little bit. So I usually end up drying them to preserve them longer.