Enlarging a Sewing Pattern
Sooner or later anyone who sews finds themselves in need of enlarging a sewing pattern at a some point.
Enlarging a sewing pattern is actually much simpler than it might seem at first. It’s great for enlarging a sewing pattern you find in a magazine, that looks good on paper, but has no enlarging instructions. It can even be used to turn doll-sized patterns into full-size reproductions; perfect if you have a daughter who wants to dress just like her favorite doll.
There are 2 methods I usually use when enlarging a sewing pattern, the first being somewhat of a “cheat” method you might say. It involves RapidResizer.com. RapidResizer a free online resizer* (*at the original time of this writing, RapidResizer was free, but has since become pay-for-use).
You simply upload your pattern to in jpg format, select the size you want it to be (use something you know the correct size needed such as a waist or bust measurement) and hit resize. It resizes it in pieces on standard printer paper and you can print it out and tape the pages together to get your full pattern. It can be used to shrink patterns as well, if you have one that’s too big, and it also works great for resizing stencils or pumpkin patterns if you’re so inclined.
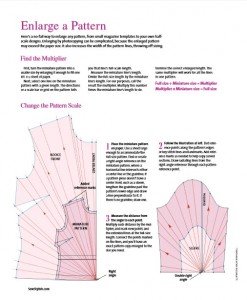
The 2nd technique doesn’t require any special equipment, just a ruler, pencil, and larger paper. To begin enlarging a sewing pattern with this method, you choose a line on the small pattern you want to  enlarge. Measure the length of that line, then decide how long you need it on your full size pattern. Divide the full-size length by the actual length of the line on the small pattern. Save the resulting number.
Next you’ll draw vertical lines out from the pattern about an inch apart. To set the length of each line, you’ll multiply the line size on the small pattern by the resulting number you saved to get the length the full size line should be. You’ll do this with each line until you have an entire pattern. It’s a bit tricky to explain, but sewstylish.com has a very nice visual guide. Click the image at right to enlarge.
By Amber Reifsteck, The Woodland Elf
The information provided on this website is for general information purposes only. If you choose to rely on the information on this website, you do so at your own risk and you assume responsibility for the results. (Full disclaimer here)
Enjoy this post? Click here to subscribe by email and get new posts delivered to your inbox.Ads by Google


