How to Make Hand Poured Candles (Container Candles)
Hand poured candles in a container are a fun and easy way to get into candle making.
")
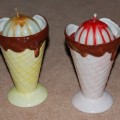
To make basic hand poured candles, you’ll be needing a double boiler (or a smaller pan, set inside a larger pan of water if you don’t have a double boiler), soy or palm wax (Check out Candlewic.com for a selection of “EcoSoya” brand soy wax, which is sustainably produced in the US), wicking, candle color, candle scent, and your chosen container. Mugs always make very attractive container candles, but you can use pretty much any glass container. I like to use old lotion jars to make tiny, but pretty container candles.
Start by putting your wax into your double boiler on low. If you’re using soy or palm wax, be sure it’s formulated for container candles, otherwise it will pull away from the edges of the container as it cools. I don’t recommend beeswax for container candles if the container is clear (see-through) because it almost always pulls away from the edges.
Let the wax melt down and add color to your desire. Then allow the wax to continue heating to the recommended pouring temperature. Different types of wax have different pouring temperatures, so check the package for your particular type of of wax. Generally soy wax is between 120-140 degrees, and palm wax around 200 degrees.
Pour a little bit of wax into the bottom of your container, somewhere around half an inch. While the wax is still liquid in the container, take a piece of wicking and push one end of it into the center of the wax in the bottom of the container. For container candles utilizing soy and palm wax, it’s best to use a paper core wick, as it burns a little hotter and leaves the jar a little cleaner after the candle is burned out.
Leave the wick end in until the wax is completely hardened around it. Once hardened, reheat your leftover wax in the pan back up to pouring temperature. When it reaches pouring temperature, add in your desired scent (as a general rule, add 1 oz of scent per pound of wax; you can add or decrease the amount as desired). Stir in the scent and pour the wax into the container, filling up until the level is a half inch below where you want the finished candle to be.
Tighten up the wick (being careful not to pull it out of the hardened wax in the bottom of the container) until it’s straight. Wrap the loose end of the wick tightly around a pencil and lay the pencil across the top of your container so the wick is in the very center of the candle. Wait for the wax to start hardening.
 When the top of the candle has hardened against firm pressure, take a knitting needle or something similar and poke several holes into the hard top around the wick. The candle inside should still be warm and soft. Reheat your wax to pouring temperature and pour the wax into the holes you created, filling up the last half inch of room to the point where you want your finished candle to be. Wait for the candle to completely harden. When the candle has completely hardened, unwind the wick from the pencil and cut it off a half inch above the wax level. Then light and enjoy.
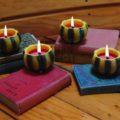
Once you’ve master the basic container candle, you can get creative making multi-wick candles. Choose wide containers, at least 3 inches in diameter or wider. You’ll make them exactly the same way as a single wick candle, but this time, instead of putting a single wick in the center, you’ll even space three wicks around the candle.
Written by Amber Reifsteck, The Woodland Elf
The information provided on this website is for general information purposes only. If you choose to rely on the information on this website, you do so at your own risk and you assume responsibility for the results. (Full disclaimer here)
Enjoy this post? Click here to subscribe by email and get new posts delivered to your inbox.Ads by Google