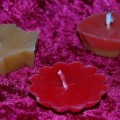
Ice Cream Candles
 These ice cream candles look good enough to eat, but are actually just soy wax candles.
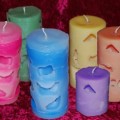
To make these candles, you’ll be needing both soy wax and beeswax and ceramic ice cream sundae cups (if you can’t find them locally, you can get them here on Amazon.com). Start by heating up your soy wax as you normally would. If you want your candle to be “vanilla” ice cream, leave the soy wax white. Alternatively if you want a “chocolate” ice cream sundae candle, dye the soy a light brown.
When the soy wax reaches pouring temperature, pour a little into the bottom of the ice cream cup. Then stick a piece of paper core wicking into the center of that hot wax. For this particular candle, you want to make sure your piece of wick is several inches higher than the top of your ice cream cup. You’ll be using it later on in the making.
Let the wax in the ice cream cup harden around the wick end. Once the wax is hardened, wind the excess wick around a pencil and lay it over the center of the ice cream cup, making sure the wick is pulled up tight (just be careful not to pull it out of the hardened wax). Reheat the remaining soy wax to pouring temperature. When it reaches pouring temperature again, add in your candle scent. Since the theme of this candle is ice cream, vanilla scent makes a good choice.
Pour the remaining wax into the ice cream cup, stopping when it reaches about a half inch below the top of the cup. Wait for it to harden. Ice cream cups are generally thin enough that you won’t need a second pouring, but if a little well does begin to form in the center of the wax, go ahead and do a second pouring. Pouring in just enough to cover the well and make the top smooth, but no more.
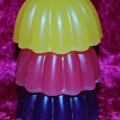
While the wax in the ice cream cup is cooling, reheat your soy wax to pouring temperature  once again. It should already have the vanilla scent in it still, so you won’t have to re-scent it. Once it reaches pouring temperature, pour the wax into a fluted jello mold (with domed top if possible, but if not, flat-topped will work too). You wont be putting any wick in the jello mold, so fill the mold all the way up with the first pouring. Then wait for it to harden.
Once the jello mold candle has cooled, pop it out of the mold. Then heat up a knitting needle, or other similar object, push it through the center of the jello mold candle. Push it all the way through the center, from top to bottom, to make a hole all the way through.
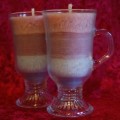
Then go back to your ice cream cup. If the wax has completely hardened, unwind the excess wicking from the pencil and dip the tip in a little hot wax to harden it. Then push it through the hole in the bottom of the jello mold candle, and pull it up tight until the jello mold candle in sitting on the wax in the ice cream cut. Then put the whole candle in the freezer.
While the candle is freezing, take a little beeswax and heat it up, just until it’s fully liquid, but no more, as you don’t want it to be too hot or it will be too thin. You can color the beeswax depending on what kind of “sauce” you want on your ice cream: red for strawberry, natural for caramel, or brown for chocolate. Also add some vanilla candle scent and mix it all in.
Then pull your cold ice cream candle out of the freezer. Hold the excess wick upright and slowly pour the beeswax over the top of the jello mold candle sitting on the ice cream cup. Only pour a little, just enough to look like a sauce drizzle on top of the ice cream sundae. It should freeze almost immediately against the cold candle, giving you a thick, tasty looking drizzle on your ice cream candle. Then just trim your wick, and your sundae candle is ready to burn. Copyright © Amber Reifsteck ~ The Woodland Elf
The information provided on this website is for general information purposes only. If you choose to rely on the information on this website, you do so at your own risk and you assume responsibility for the results. (Full disclaimer here)
Enjoy this post? Click here to subscribe by email and get new posts delivered to your inbox.Ads by Google