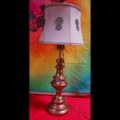
DIY Flower Power Lamp
In this tutorial I’ll show you how to make a fun DIY flower power lamp from a cheap thrift store find, to add a little bohemian flavor to your space.
MATERIALS USED:
Lamp Base:
An old lamp (check second hand shops. I found mine with a shade for $5 in the Salvation Army)
Metallic blue paint
Masking tape
Scrap paper for masking off areas
Round plastic rhinestones in various colors
Plastic rhinestones in the shapes of leaves and flowers (found in JoAnn Fabrics)
Glue that will bond metal (Power-tac)
Metallic paint in various colors
Paint brush
Lampshade:
1 fabric lampshade
Pencil
Fabric paints (I used mostly neons:)
Puffy Paints (I used neons)
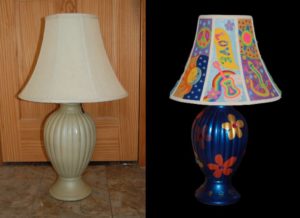
The inspiration for this lamp came from Dan Morris Art and the old trippy, Haight-Ashbury Grateful Dead, Jefferson Airplane, etc. posters. I chose that particular “groovy psychedelic” theme because it matches my personality and a lot of my other decor (I was also told by a psychic I spent my most recent past life in the Haight, so I guess that explains my attraction to the art). However, you might prefer something that looks a little less reminiscent of whatever Lewis Carol was smoking when he wrote Alice In Wonderland, so your paint colors may be a little different than mine. Either way, fabric paints are best for this project if you’re using a fabric lamp shade.
I did use some acrylic paints on this lamp, even though my shade was fabric, because there were certain colors that I just couldn’t find in the comparatively minuscule fabric paint selection. The problem with using acrylics on fabric, is that when the lamp is lit up, you can see cracks in the coverage. True fabric paint paints light up solid, so they are a better choice (unless you’re like me, and just need a certain color not available in the fabric paint section).
Also some of the acrylics I used were metallics as well. They don’t cover any more or less well than standard acrylics, but I like the look of them when the lamp isn’t on. If you’re not good at drawing free hand, you can use stencils for your chosen design, or even iron-on transfer paper. You’ll need a small iron, since most shades are round, but you’ll just go along, wrapping your transfer around the lamp and ironing it on. Then you can just paint between the lines. The puffy paint is great for adding a little dimension at the end.
The metallic blue spray paint I used for the base of the lamp was leftover from my beloved Pontiac Sunfire, Serenity (yes, named for the ship in Firefly) that I finally had to give up this year because it wasn’t repairable. So I thought it was a fitting way to use up the old paint, and always keep a piece of my favorite car with me. Do you have any pieces of your favorite vehicle that you’ve turned into decor? Let me know in the comments below. I’d love to hear how other people are preserving their favorites.
Video tutorial by Amber Reifsteck, The Woodland Elf
*Some of the above links may be affiliate links*
The information provided on this website is for general information purposes only. If you choose to rely on the information on this website, you do so at your own risk and you assume responsibility for the results. (Full disclaimer here)
Enjoy this post? Click here to subscribe by email and get new posts delivered to your inbox.Ads by Google