How to Clean Beeswax
If you’re ready to start making candles using fresh beeswax, the first thing you need to know is how to clean beeswax.
 When you purchase beeswax for candle making from a craft store, it’s gone through a filtering process to make it clean and usable for crafts. However, you won’t know how the bees were raised to make that store-bought wax. You won’t know whether they were treated with chemicals, or even what country they were from. But if you source your wax from your own hives or from other local hives, you’ll know exactly where everything came from and how it was raised. But that wax will not be as clean.
Fresh Hive Wax is not Clean Beeswax
Fresh, or locally obtained beeswax direct from the hives, is usually full of debris. It can include hidden puddles of honey, old blackened comb chunks, and pieces of dead bees. In short, it can be quite a mess that has to be cleaned before you can use it to make candles. You can filter the wax through cheesecloth, but it gets rather messy. You’ll also end up losing a lot of good wax, as it adheres to the cheese cloth very quickly. A better way I’ve found to clean beeswax, is to cook it.
It’s best to use a pan specifically reserved for cleaning as wax. It will develop a crusty “sludge” at the bottom of it after cleaning several batches of wax so you don’t want to ruin a good cooking pan. The process is rather simple. Heat up your wax like normal, making sure that you don’t overheat it, since it is very flammable. Once melted, pour it into some molds.
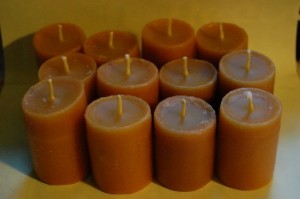 I find any type of flexible silicon molds work best, as it makes them very easy to get the chunks of wax out of later. As the wax in the molds cools, the wax and contents separate. All the “gunk” sinks to the bottom, and the clean beeswax stays on top.
Let It Cool, But Not Too Cool
Wait until the wax has hardened, but is still slightly soft and pop it out of the molds. Then just run a knife across the bottom of each molded chunk of wax, carving off the dirty parts and discarding. You’ll be left with a molded chunk of perfectly cleaned wax that you can then use to make your candles. And if you find that your wax isn’t clean enough after one processing, just repeat the process a second time. That way you’ll be able to clear out any bits of “gunk” that you missed the first time.
Happy candlemaking!
By Amber Reifsteck, The Woodland Elf
*Some of the above links may be affiliate links*
The information provided on this website is for general information purposes only. If you choose to rely on the information on this website, you do so at your own risk and you assume responsibility for the results. (Full disclaimer here)
Enjoy this post? Click here to subscribe by email and get new posts delivered to your inbox.Ads by Google