Star Wars Thermal Detonator DIY
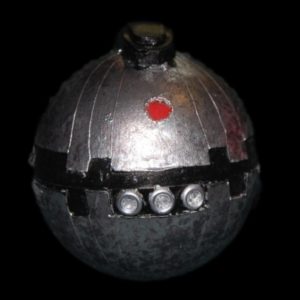
In this tutorial I’ll show you how to make the Star Wars thermal detonator seen in Return of the Jedi.
MATERIALS USED:
Clear fillable ornament
8×8 inches of Wonderflex Pro (or use craft foam as a substitute)
White school glue and Foam brush
Scissors or exacto knife
5mm craft foam scrap
2mm craft foam scrap
Hot glue gun
Chrome silver paint
Metallic Gunmetal Gray paint and soft bristle paintbrush
Black Metallic paint
Country Red paint
3 silver eyelets
Glue that will bond metal (I used Power-tac)
Finger lights (optional)
In my last order of Wonderflex I received a small sample of Wonderflex Pro, a new product from the Wonderflex company. What sets it apart from traditional Wonderflex is that it doesn’t have the mesh backing, so it can be used to form perfect half spheres. So I figured it’d be perfect for making this requested Star Wars thermal detonator tutorial.
You can also heat up craft foam to cover the ball in the same manner if you want a cheaper alternative. Though foam won’t be quite as strong, and you’ll have to glue it to the ball, since it doesn’t self-adhere the way the Wonderflex does.
Personally I think the Wonderflex Pro has a smoother texture than traditional Wonderflex as well, so I only used a couple coats of glue over it. If you’re you’re using foam on your Star Wars thermal detonator, however, you’ll need 3 or 4 coats of glue to get a smoother surface.
Video tutorial by Amber Reifsteck, The Woodland Elf
*Some of the above links may be affiliate links*
The information provided on this website is for general information purposes only. If you choose to rely on the information on this website, you do so at your own risk and you assume responsibility for the results. (Full disclaimer here)
Enjoy this post? Click here to subscribe by email and get new posts delivered to your inbox.Ads by Google


