Fosshape: Is It Fabulous or Not?
So maybe you’ve heard of Fosshape, and you’ve considered trying it, but you wonder if it’s really as great as it sounds. Well, I recently had a chance to try it out for the first time, so let’s dig in and find out.

What is Fosshape?
Fosshape is a felt-like material made by the same people who brought us Wonderflex. It comes in several different thicknesses and is heat-reactive. It hardens and holds shapes when heat is applied it.
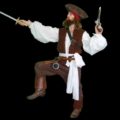
I’d been dying to try Fosshape for a while after reading about it. I’d been looking for a way to make fairly seamless hats, and it sounded like it might be exactly what I was looking for, but I didn’t want to just rush into it. I had to wait until the right project came around for it. So when I it made down to the Jack Sparrow costume on my long list of tutorials requested by followers, I knew that the Jack Sparrow hat would be the perfect piece to test it on. (If you want to see it live action, check out the Jack Sparrow hat tutorial here)
Fosshape is Flexible
I ordered a yard of Fosshape 300 from Wonderflexworld.com It runs about $14 a yard  (and they’re wide yards) so it’s pretty affordable. They also sent me a sample of the black Fosshape 400. The Fosshape 300 is what I used for Jack Sparrow’s hat.
I tested the stretch in several directions, and found it had a very impressive amount of stretch, something lacking in traditional felt. So I decided to use that stretch to my advantage forming the center of Jack’s hat over the rounded bottom of a gourd. I pulled and stretched until it was tight around it, and then heated it up.
When heating it up, a heat gun would work beautifully, but at the time, my heat gun was not available for use. So I used a combination of hairdryer, and holding it over my woodstove (redneck cosplayer style) to apply the heat to it. It’s not a very even heat, and the hairdryer takes forever, so I would definitely recommend a heat gun. However, even with my non-traditional heating methods, the Fosshape eventually heated up nicely and formed itself right around the gourd form I was using.
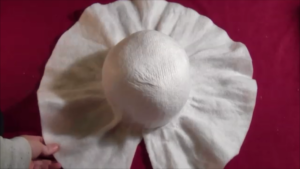 The result was a beautifully formed dome, that was now rigid. It stayed perfectly in the dome shape when I pulled it off the gourd. Once it’s hardened, Fosshape has a texture similar to Pellon (which if you’ve followed me for a while, you know it’s one of my favorite materials). However, Pellon is always stiff, and therefore its use is limited. With the Fosshape, you can form it into pretty much any shape while it’s in its soft state, and then harden to the pellon-like state once you’ve got it where you want it.
Fosshape is Fairly Forgiving
When I first formed Jack’s hat, I didn’t realize the gourd I was using was quite a bit smaller than my brother’s head. So once I had hardened it around the gourd, I realized that dome was never going to fit my brother. So I got a bigger gourd, and reheated the Fosshape.
It doesn’t return to its fully soft state when you reheat it, but it does get soft enough to do what I had to do, which was reshape it enough to fit over a bigger gourd. Essentially I was just slightly enlarging the dome. I found the Fosshape to be very forgiving in this process, reforming itself around the new bigger gourd with ease.
When using Fosshape, it may also be helpful to form curves by cutting half circles from 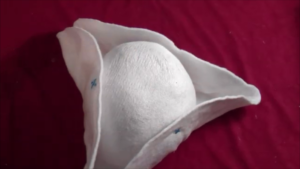 the material and sewing them together before trying to mold them to form a dome. However, since it was my first time using Fosshape, I wanted to see just how far I could push it. – Turns out I could push it pretty far, because in addition to forming a full dome out of one piece, I was even able to fold up and form the sides of the hat from the same piece. I succeed in creating the entire hat without a single seamline, which was exactly what I had been hoping to do.
Painting Fosshape
After it’s hardened, Fosshape becomes a bit smoother, but it does retain a bit of its fuzzy texture. As such you may want to give it a coating of gesso or something similar to smooth it out. I chose to skip this, and just painted directly onto the Fosshape.
I used multiple colors of spray paint to give it a leather look. I also tried to add a few more colors with some acrylic paint, but found that was a terrible idea as the acrylic 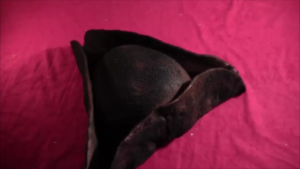 paint and the spray paint were different textures, so they showed up differently on the feltiness of the Fosshape. So when you’re painting Fosshape, if you skip the gesso, be sure the paints you’re using are all the same texture.
So after fixing the problem with the multiple textures by repainting everything with the spray paint, I finished the hat. While you can see the fuzzy texture under the paint if you’re standing right next to it, from a few feet away, the felty texture completely disappears, and it very convincingly looks like a battered leather pirate hat.
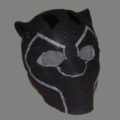
Fosshape Black
I decided to use the sample of the black Fosshape 400 for a Black Panther helmet (tutorial for that here). The Fosshape 400 is quite noticeably thicker than the Fosshape 300, so at first I was pretty sure I wasn’t going to like it as well. Still, it was already black which meant I wouldn’t have to paint it, so I proceeded.
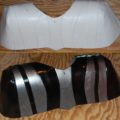
Given the more detailed shape and multiple curves of Black Panther’s helmet, I opted to 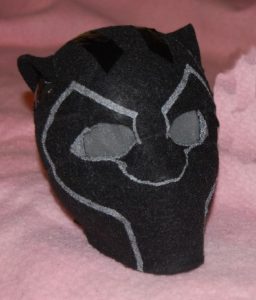 do the sew-before-heating method, so I could get exactly the shape I wanted without having to try stretching and holding the Fosshape in ten different directions. I sewed it using the zigzag stitch on my sewing machine to sew each piece to the other, so I didn’t have to add any additional thickness by overlapping the pieces.
So, once I’d sewn the base pieces of the helmet together (don’t worry, I’ll have a pattern with the tutorial), I proceeded to pin the helmet to the mannequin head. I used one of those little foam mannequin heads (because I was making this for a child, but you’ll need something bigger if you’re an adult). It’s important to use something the same size or a little larger than your head, or the helmet will end up too small for you. You have to pin it exactly how you want it to sit, because it will harden exactly as it’s pinned. Once pinned, I heated it up over my woodstove.
Now this was the moment when I changed my mind and decided I might actually like the Fosshape 400 even better than the 300. When the Fosshape 400 heats up, it hardens just like the other, but it shrinks in thickness, which I loved, because it made it look so sleek and, well, Wakandan. It was like something Shuri cooked up in her lab.
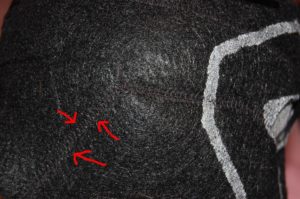
Barely noticeable stitch lines
The shrinkage almost completely hides the seamlines. In fact when I showed it to my brother, he was holding it in his hands, and thought I had made it all out of a single piece of Fosshape, because he hadn’t even noticed the seamlines. The shrinkage of the Fosshape around the seams makes them look very smooth and intentional.
So what do I think of Fosshape? Well, to put it simply, I love it! This stuff is everything a cosplayer would hope it to be. It stretches, it forms any shape, it hardens like a thermoplastic, but is still fabric-y enough to not look like plastic. So to answer the title, question, yeah, Fosshape is pretty fabulous!
By Amber Reifsteck, The Woodland Elf
The information provided on this website is for general information purposes only. If you choose to rely on the information on this website, you do so at your own risk and you assume responsibility for the results. (Full disclaimer here)
Enjoy this post? Click here to subscribe by email and get new posts delivered to your inbox.Ads by Google